Web Components
作为开发者,我们都知道尽可能多的重用代码是一个好主意。这对于自定义标记结构来说通常不是那么容易 — 想想复杂的 HTML(以及相关的样式和脚本),有时您不得不写代码来呈现自定义 UI 控件,并且如果您不小心的话,多次使用它们会使您的页面变得一团糟。
组成
Custom elements(自定义元素)
Shadow DOM(影子 DOM)
HTML templates(HTML 模板)
Custom elements(自定义元素)
允许您定义 custom elements 及其行为,然后可以在您的用户界面中按照需要使用它们。
1
2
3
4
5
6
7
8
9
10
11
12
13
14
15
16
17
| class ShadowElement extends HTMLElement {
constructor() {
super()
}
connectedCallback() {
const mountPoint = document.createElement('div');
const shadowRoot = this.attachShadow({ mode: 'open' });
shadowRoot.appendChild(mountPoint);
ReactDOM.render(<MyApp />, mountPoint);
}
}
customElements.define('my-custom-element', ShadowElement);
|
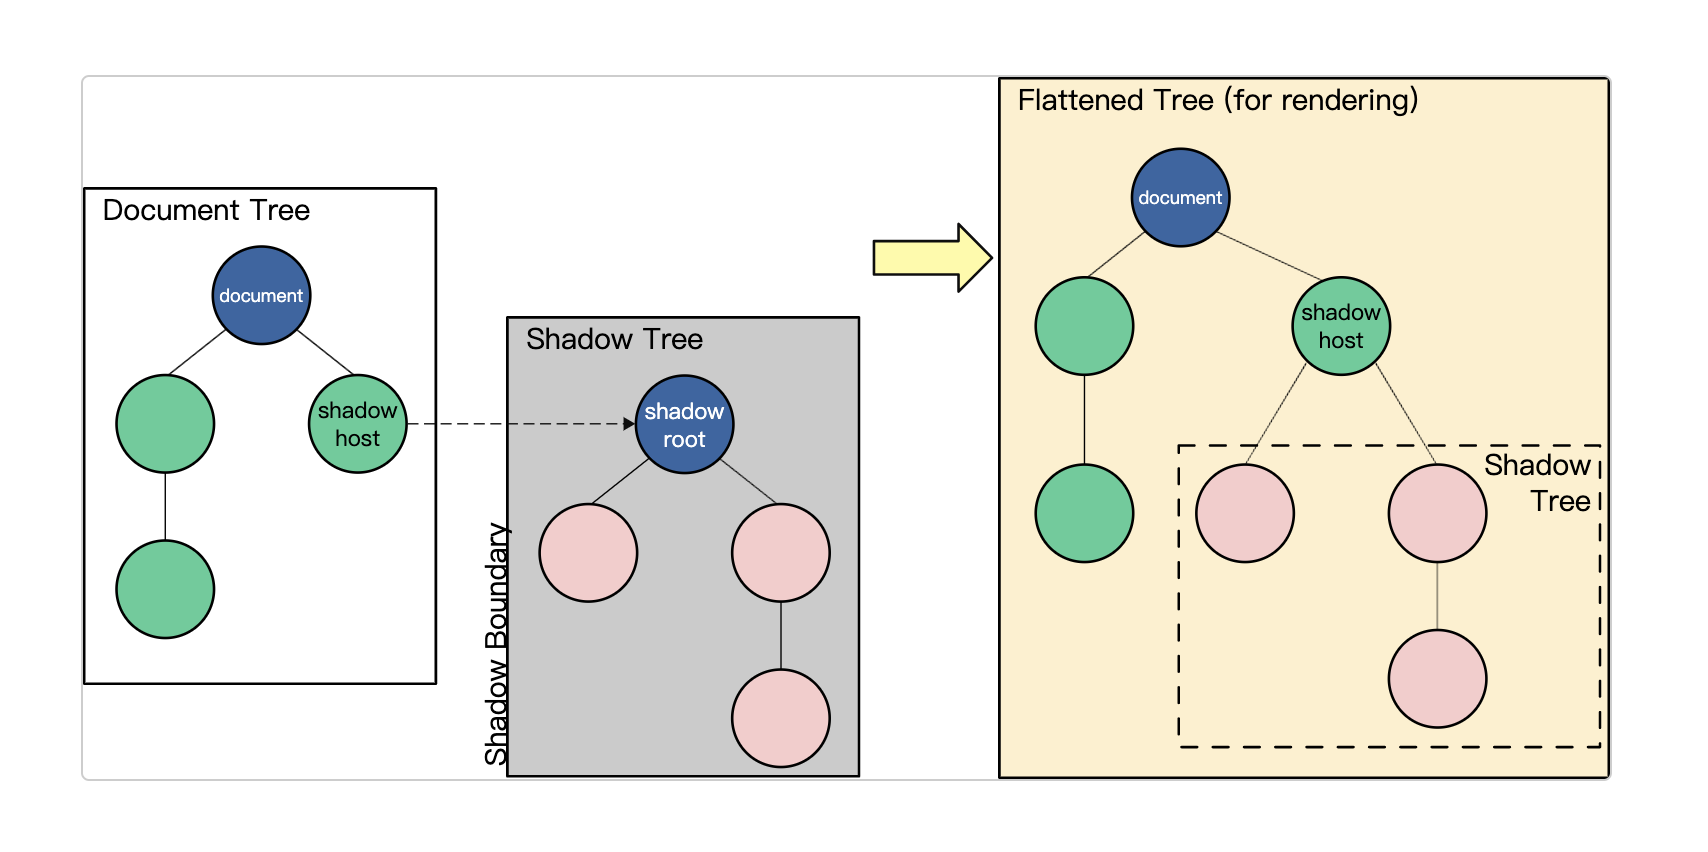
Shadow DOM(影子 DOM)
有一些 Shadow DOM 特有的术语需要我们了解:
- Shadow host:一个常规 DOM 节点,Shadow DOM 会被附加到这个节点上。
- Shadow tree:Shadow DOM 内部的 DOM 树。
- Shadow boundary:Shadow DOM 结束的地方,也是常规 DOM 开始的地方。
- Shadow root: Shadow tree 的根节点。

基本用法
1
2
| let shadow = elementRef.attachShadow({mode: 'open'});
let shadow = elementRef.attachShadow({mode: 'closed'});
|
open 表示可以通过页面内的 JavaScript 方法来获取 Shadow DOM,例如使用 Element.shadowRoot 属性:
1
| let myShadowDom = myCustomElem.shadowRoot;
|
templates and slots
复用结构,减少使用相同的标记结构。
此元素及其内容不会在 DOM 中呈现,可使用 JavaScript 去引用它。
1
2
3
| <template id="my-paragraph">
<p>My paragraph</p>
</template>
|
上面的代码不会展示在你的页面中,直到你用 JavaScript 获取它的引用,然后添加到 DOM 中,如下面的代码:
1
2
3
| let template = document.getElementById('my-paragraph');
let templateContent = template.content;
document.body.appendChild(templateContent);
|
在 Web Components 中使用模板
1
2
3
4
5
6
7
8
9
10
11
| customElements.define('my-paragraph',
class extends HTMLElement {
constructor() {
super();
let template = document.getElementById('my-paragraph');
let templateContent = template.content;
const shadowRoot = this.attachShadow({mode: 'open'})
.appendChild(templateContent.cloneNode(true));
}
})
|
使用槽 (slots) 添加灵活度
改造 my-paragraph
1
| <p><slot name="my-text">My default text</slot></p>
|
跟 Vue 插槽一样的用法。
1
2
3
4
5
6
7
8
9
10
11
12
| <my-paragraph>
<span slot="my-text">Let's have some different text!</span>
</my-paragraph>
<my-paragraph>
<ul slot="my-text">
<li>Let's have some different text!</li>
<li>In a list!</li>
</ul>
</my-paragraph>
|
完整示例:
1
2
3
4
5
6
7
8
9
10
11
12
13
14
15
16
17
18
19
20
21
22
23
24
25
26
27
28
29
30
31
32
33
34
35
36
37
38
39
40
41
|
<body>
<h1>template & slot</h1>
<template id="my-paragraph">
<slot name="title">
<h1>Default Title</h1>
</slot>
<slot>default slot</slot>
<p>My paragraph</p>
</template>
<my-paragraph>
<h1 slot="title">Slot title</h1>
</my-paragraph>
<hr>
</body>
class MyParagraph extends HTMLElement {
constructor() {
super()
}
connectedCallback() {
let template = document.getElementById('my-paragraph');
let templateContent = template.content;
this.attachShadow({ mode: 'open' })
.appendChild(templateContent.cloneNode(true))
}
}
customElements.define('my-paragraph', MyParagraph)
|
组件通信
Lightning Web Component
在 LWC 中,可以通过实现 CustomEvent 接口进行自定义事件,通过 EventTarget.dispatchEvent() 来分配事件。
注意:
定义事件时,不需要在事件名前加 on,因为在使用的时候会默认在名称前使用 on,比如:当我们定义了 click 事件,在 HTML 代码中用 onclick 来调用它
父组件
1
2
3
4
5
6
7
8
9
10
11
12
13
14
15
|
connectedCallback() {
const child = this.shadowRoot.querySelector('child-wc')
child.setAttribute('text', 'Parent changed the Text')
child.addEventListener('custom-event', ({ detail }) => {
console.log('事件触发 ', detail.value);
})
}
|
子组件
1
2
3
4
5
6
7
8
9
10
11
12
13
14
15
16
|
connectedCallback() {
const event = new CustomEvent('custom-event', {
detail: {
value: 'child web component'
}
})
this.dispatchEvent(event)
const btn = this.shadowRoot.querySelector('button')
btn.addEventListener('click', () => {
this.getRootNode().host.sayHello('Hello :')
})
}
|
子组件直接调用父组件实例上的方法
1
2
3
4
5
6
7
8
9
10
11
12
13
14
15
|
sayHello(msg) {
console.log(msg, this.data)
}
connectedCallback() {
const btn = this.shadowRoot.querySelector('button')
btn.addEventListener('click', () => {
this.getRootNode().host.sayHello('Hello :')
})
}
|
监听组件上属性的变化
1
2
3
4
5
6
7
8
9
10
11
12
13
14
15
16
17
|
const child = this.shadowRoot.querySelector('child-wc')
child.setAttribute('text', 'Parent changed the Text')
static get observedAttributes() {
return ['text'];
}
attributeChangedCallback(name, oldValue, newValue) {
console.log('name', name)
console.log('oldValue', oldValue)
console.log('newValue', newValue)
}
|
web component in ReactJS
React 和 Web Components 为了解决不同的问题而生。
Web Components 为可复用组件提供了强大的封装,而 React 则提供了声明式的解决方案,使 DOM 与数据保持同步。
两者旨在互补。作为开发人员,可以自由选择在 Web Components 中使用 React,或者在 React 中使用 Web Components,或者两者共存。
问题
“react”: “^16.12.0”
1
2
3
4
5
6
7
8
9
10
11
12
13
14
15
16
17
18
19
20
21
22
23
24
25
26
27
28
29
30
| class MyApp extends React.Component {
render() {
return <span onClick={() => alert('I have been clicked')}>Click me</span>;
}
}
class ShadowElement extends HTMLElement {
  constructor() {
    super()
  }

  connectedCallback() {
    const mountPoint = document.createElement('div');
    const shadowRoot = this.attachShadow({ mode: 'open' });

    shadowRoot.appendChild(mountPoint);

    ReactDOM.render(<MyApp />, mountPoint);
  }
}


customElements.define('my-custom-element', ShadowElement);
<div className="app-main" onClick={()=> console.log('app main clicked')}>
<my-custom-element></my-custom-element>
</div>
|
效果图

“react”: “^17.0.2” 及以上版本,已解决此问题。
代码一致,效果图。

解决方案
Web Components 触发的事件可能无法通过 React 渲染树正确的传递。 你需要在 React 组件中手动添加事件处理器来处理这些事件。
Shadow DOM 重定向了 click 事件并将其封装在 shadow 中,将组件内部的所有内容封装在单独的作用域中,并隔离事件。React 并不支持这样的 Shadow DOM,因此事件委托失败,事件无法触发。
这意味着,如果您将带有 click 事件的 React 组件放在 Web 组件中,则点击事件可能不会冒泡到 React 组件中。这是因为事件在 Web 组件的 Shadow DOM 中触发,然后被封装在 Shadow DOM 中,而不会传播到外部组件。
如果您希望在使用 Web 组件时能够触发 React 事件,则可以使用上述方法之一,例如重新绑定事件到实际的 shadow 容器并使用 “__reactInternalInstances” 来调度正确的 React 事件。您还可以使用其他方法来解决此问题,例如使用自定义事件或使用事件代理。
https://stackoverflow.com/questions/37866237/click-event-not-firing-when-react-component-in-a-shadow-dom
相关文章:当 Shadow Dom 遇上 React event
https://github.com/huruji/blog/issues/104
编写组件
https://juejin.cn/post/7157955953776820254
https://juejin.cn/post/7161816035186720781
https://quark-design.hellobike.com/#/
参考链接


